
Wednesday 5 August 2020
Thursday 9 July 2020
Constructive Alignment explained
A brief video introduction to constructive alignment, how it's more difficut than it sounds and soem guidance on improving your ability to use it consistently
Thursday 14 May 2020
Using Genre Pedagogy to develop student writing.
A common and very useful technique used in the teaching of teaching these features of scientific writing is the genre pedagogy cycle. This is a strategy that is applicable acriss the curriculum; here I present how I use it as science teacher and here is how a History teacher uses it in there subject (Kudos- this is where I first encounterred it on Lee Donaghy's superb and illustrative blog posts ) I have simplified this below.
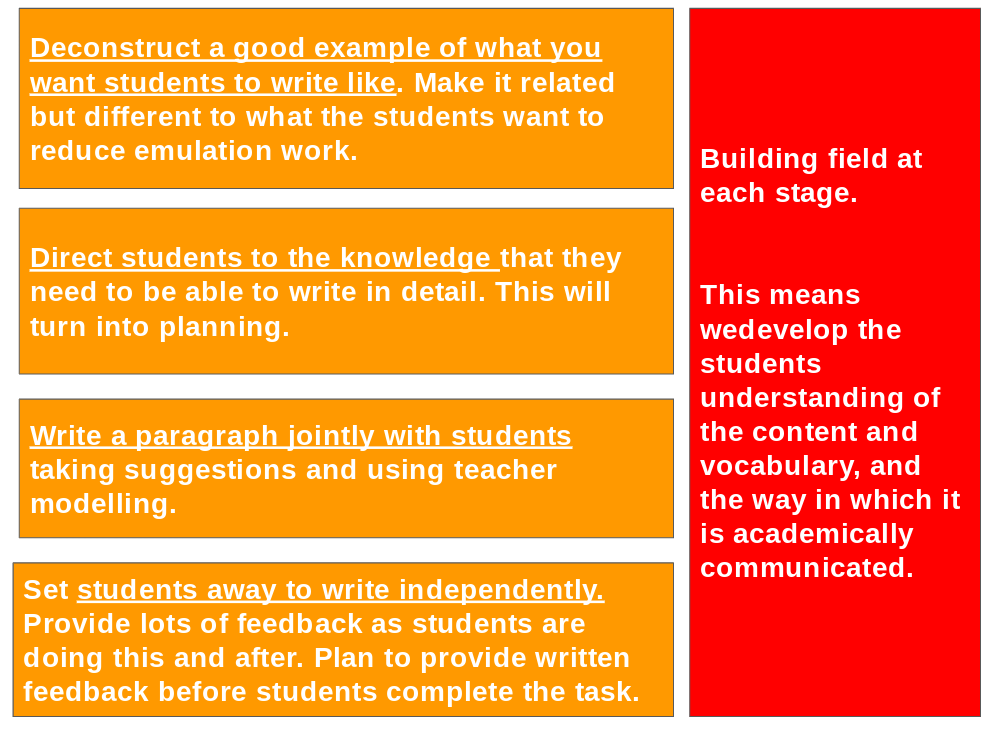
The skill of essay writing is complex and so naturally fits into something that can be broken down into smaller parts. The first step of the genre pedagogy cycle is to deconstruct an exemplar piece of text that is ideally closely related to the topic the students will practise with independently. This prevents them from merely copying the teacher and is an opportunity to revisit prior knowledge. This is followed by a joint construction stage in which the teacher who, through questioning, involves the students in the co-construction of a text. This will inevitably will be a collection of student ideas which the teacher improves and talks through in the process of recording those ideas. It is vital that the teacher shares their internal monologue while doing this, saying what they think and why certain sentence structures work and so on. Next, the students are sent away to practise writing independently. The students will require large amounts of feedback during and after the writing process, along with multiple opportunities to write academically to fully develop this essential skill.
An example dissected.
In preparation for writing an essay on ‘Where does new human life come from?’ in which they are asked to use connectives to sequence the action (e.g. next, firstly, following that, this leads to, then), the students, with guidance and teaching, break down a couple of paragraphs on external fertilisation in amphibians:
"External fertilisation is a form of reproduction when the female’s ovum is fertilised by the male’s sperm outside of the female body. Since sperm need to swim and the developing egg must be moist, external fertilisation always occurs in water. Elaborate courtship rituals are sometimes used to ensure that the sperm and the eggs are released close enough together to ensure fertilisation. It is therefore unsurprising that fish and amphibians are the organisms that use this method to create new life. "
"External fertilisation has many advantages, especially for the parents. After fertilisation, many species of fish and amphibians do not expend effort in looking after the young. This allows them to feed and breed again so that they produce large numbers of offspring to increase the chance of some surviving to adulthood."
The purpose of this is to identify the strategies, styles and rules that must be focused on while writing. As a rule, I always start by recording student observations and comments before moving on to any aspect of teaching, which allows me to start where the students are at. I then begin to model that this is a collaborative process which, in turn, sets up one the main requirements for deliberate practice to take place – namely, that the students need to understand the task so they have some element of control. I find that this helps to invest the students in the conscious and focused effort needed for success. If the students do miss something, then the example (if it is well planned) should show them how to write scientifically. A list of the characteristics evident in the example might include:
- Written in the third person.
- Each paragraph starts with a topic sentence that says what something is and what it does.
- Each topic sentence includes a topic noun early in the sentence.
- Written in the past or present tense.
- Is specific in describing where and when something occurs.
- Sequences the processes using time connectives.
Only after the students have this understanding will I present the task they are to complete. This will highlight the content to be included and the writing skills I expect to see – in this case:
Extended writing task: Where does new human life come from?
Your task is to write a report about how the male and female reproductive systems develop and how they work in the conception and development of new life.
Content criteria
The report must include the following information:
- The organs involved correctly spelled and their role described.
- Describe the process of puberty for your gender and the opposite one.
- Explain how fertilisation and implantation is more likely on certain days of the menstrual cycle.
- Name the sex cells and explain how they come together.
- Describe each stage of how a fertilised egg grows into a baby during pregnancy.
- Explain how the placenta and the mother’s blood supply provide the oxygen and the nutrients needed for the baby to grow.
Report criteria
Writing to inform
To inform means to give facts to another person.
When writing to inform/report, make sure:
- Language is clear, factual and impersonal.
- Use short and clear sentences.
- Break up the writing with diagrams, illustrations, pictures and subheadings.
- Topic nouns organise the text.
Writing to explain
To explain means to make clear, show the meaning or to account for – you are trying to say how or why something happens.
- Writing to explain is generally in the third person and in the past or present tense.
- Use clear and factual language.
- Use sentences that link a cause and an effect.
- Use connectives to compare (e.g. whereas, though, while, unless, equally, however).
The next phase of the genre pedagogy cycle is to jointly construct some writing with the students. Once more, the control of this activity is seemingly with the students, but it remains an opportunity for me to model, when necessary, how I would go about completing the task. I start by giving the students a minute or two to come up with a potential topic sentence. I then either take multiple examples and write them up on the whiteboard (or type them up) or take one and seek to improve it.
The process may take student writing through the following developments:
| Skill being practised | Co-constructed sentences |
| Start | The organs are the ovaries, uterus and testes. |
| Addition of detail | The main organs are the ovaries, uterus and testes. |
| Locating when this is occurring | The main organs involved in reproduction are the ovaries, uterus and testes. |
| Adding detail – linking back to the topic sentence | The main organs involved in reproduction are the ovaries, uterus and testes. The ovary releases the egg. |
| Locating the action | The main organs involved in reproduction are the ovaries, uterus and testes. The ovaries are where releases the egg. |
| Checking and correcting grammar | The main organs involved in reproduction are the ovaries, uterus and testes. The ovaries are where the egg is released. |
| Adding detail | The main organs involved in reproduction are the ovaries, uterus and testes. The ovaries are the place where the egg is developed and released. |
| Applying sentence structure and going back over to add further (locating) detail | The main organs involved in reproduction are the ovaries, uterus and testes. The female’s ovaries are the place where the egg is developed and released. The male’s testes is the place where the sperm are developed and released. |
| Final – interestingly worked backwards to add more detail and connectives to emphasise detail | The main organs involved in reproduction are the ovaries, uterus and testes. The major female organs are the ovaries and uterus. The ovaries develop and release the egg, whereas the uterus grows and develops the embryo. The male testes develop and release sperm cells. |
The process continues, building up each sentence and paragraph until it is complete or it is clear that the students are ready to practise independently. This is clearly a slow and time consuming task. This particular task (which is for Year 7s) takes about 45–60 minutes before they get to practise independently. However, the conditions for deliberate practice have now been established and the students are therefore more likely to set about practising and writing to a high(er) standard.
The process of practice is hard work. During this phase, it is important to focus on whether the students are aware of what it is they are being asked to do rather than on the quality of what is being written. Having the success criteria and examples available makes this a much more tangible thing for the students to understand and therefore deliberately practise.
Opportunities to demonstrate learning
There are two purposes in planning this kind of learning activity. Firstly, it acts as another exposure to the information but it also serves to transfer the knowledge to subtly new situations, taking the student from novice to expert. Secondly, the type of feedback required for this type of activity will be more academic or content based, as opposed to the procedural or ‘how to’ feedback that practice requires.
Even simple strategies such as completing an exam question can achieve this, providing the students have the chance to rehearse the ideas, elaborate on them, recall them and then reflect on them with constructive feedback. The feedback a teacher provides should be a combination of content based comments and guidance on how to do something. This includes how the knowledge is organised.
Thursday 23 April 2020
Helping students practice academic writing :Connecting "Cause" and "Effect"
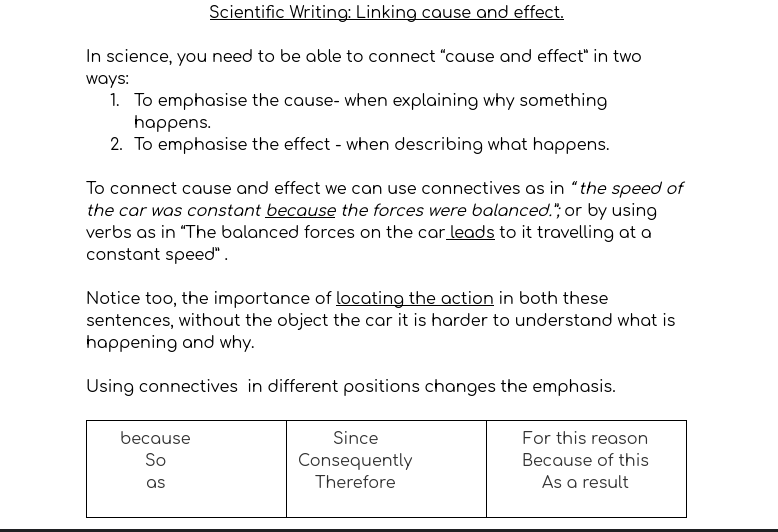
I have once again become very interested in student literacy. Especially in how it can deepen student thinking and develop their understanding of the content through deliberate practice. Science teachers (at least this one does) get very fustrated with students answer "it gets faster". What gets faster? Why does it get faster? So, for me, the ability to connect cause and effect either the through connectives or verbs is a key strategy for students to practice.

This worksheet is designed to firstly give the rules and some explained examples. The examples show how changing the position of the cause and effect and/or the "connective" can change the emphasis from being placed on the cause to being focused upon the effect. Simply put whatever is found at the end of the senetnce will have the emphasis; placing the cause before the effect places the emphasis on the effect; and vice versa. The student response "it gets faster" is fine in short questions but will very quickly become meaningless whem explaning ideas that have multiple steps or factors in play. The examples are also used to highlight the need to locate the action, another key skill in (more complex) scientific explanations. Students are asked to label the Cause, Effect and COnnective to encourage a little metacognition on the structure of sentences.

The worksheet is designed to increase the cognitive load throughout, allowing students to embed this skill. The first task merely asks the students to select an appropriate connective. It also sets up more examples students can refer to, by having this as such a clozed exercise students get to interact with more complex scientific examples.
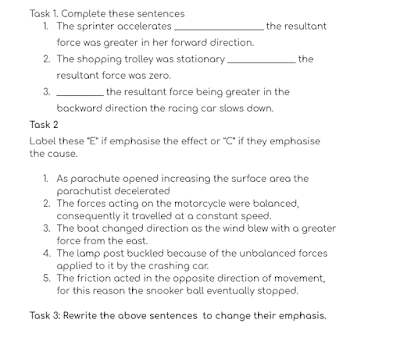
The second task again reduces cognitive load by asking students consider where the emphasis is. Is this a sentence that highlights the casue or the effect taking place. Again this task helps provide a range of examples, and labouring the content. It is hoped that this activity will encourage student to metacognitively consider how they write.
The third task is bigger step up asking students to rewrite the sentences to change their emphasis. The support that makes this leap of faith manageable is that all the information they need is in the example they are working on and in the previous tasks.
Finally students have a few questions to answer. To complete this they need to infer what the emphasis needs to be, and then structure an answer. Although the questions have novel situations, they content is the same as in previous tasks so that students can focus on writing this well. The questions increase in difficulty with questions 1 and 2 are simple and straightforward to answer as either the cause or effect is given, while questions 3 and 4 students will need to workout what will happen and then explain it. The examples in Task 1, which uses the language of resultant force should support them in completing this

The following are useful generic links, with examples:
https://www.open.edu/openlearn/ocw/mod/oucontent/view.php?id=19204§ion=5
https://www.learninghub.ac.nz/cause-and-effect-writing-structures/
If you would like a copy please click here:
https://docs.google.com/document/d/1Iky47JvOhUfCb31bC-WnTmVphMJS4S8whEEqhxX_5WE/edit
Friday 3 April 2020
Some interesting approaches to building school cultures.
One of the more enigmatic findings in Graham Nuthalls work is his unpicking of classroom and learning cultures , not all of which are positive and nurturing. Where the
relationships between students determining largely whether they are supportive or
not. Nuthall shines a light on this problem but gives (disappointingly - am I allowed to even think this? )little by way of practical solution. He suggests that to negate negative peer cultures teachers should “subtly work with it to manage each students
learning opportunities “ and to “ create a powerful classroom culture that
overrides the natural peer culture”.[2] So what might a "powerful classroom culture" look like?
Due to the complex nature of
cultures, it may be useful to look at some case studies of how different
institutions have set about tackling establishing a “powerful classroom
culture” .
The Expeditionary Learning schools, and Uncommon school may at first appear
diametrically opposed being either student centric to teacher centric models.
However, it is the commonalities that may provide more use in establishing our
classroom cultures. I recognise strategies and approaches from both in my
classroom, and that’s OK. It really is.
The clearest and most impassioned
view of what powerful learning communities can look like can be found within
the pages of Ron Berger’s inspiring book “An Ethic of excellence” If you
haven’t read it, you must. Do it now. Go to a bookshop. Take my car. Just do
it. In it, Ron shares his passion for high quality student work, which provides
for him, and the teachers at Expeditionary Learning Schools, the mechanisms for
building a supportive and challenging community. High quality student work
encapsulates all aspects of how and what students do: from Maths work to how
they communicate publicly. They make clear what the expected standards are for
each aspect of school life and then relentlessly teach and model it so that
students understand what they must do in order to attain it. It clearly makes
for aspirational and motivated students who know how to provide one another
with “kind, specific and feedback” during the act of learning.
At the heart of Expeditionary
Learnings philosophy[3]
(and similar schools such as the High Tech High group of schools in San Diego)
is that success is defined by getting everyone to the top of the mountain not
just ourselves. The strength of the school resides in the strength of its
community. Students are therefore obliged to think of others and their role
with their community, and as a result see themselves as active participants in
their education becoming “crew not passengers” [4] along the way. In fact, my first
classroom experience at High Tech High saw me naively ask a student what they
were working on. The student showed no signs of pity in his response, but did
not show me his work, but showed me around the classroom describing in
astonishing detail the work of his fellow students. It was clear that their
work was his work, and as result he benefited from a deep understanding of the
subject.
It is no surprise that these
schools engage with the wider community as a lever for student responsibility
and learning. In these schools, the students undertake public exhibition of
their work. These high stakes, reviews of their learning and character occurs
regularly throughout the year and becomes the motivational mechanisms for the
students.
My first exposure to students
exhibiting their work was at High Tech High in San Diego. The students had been
building toys for first graders that involved using a cam in the toys
mechanism. The first graders had been interviewed by the students to develop a
design brief, allowing them to make a bespoke toy for the younger child. A
dozen or so international visitors were lead into the exhibition hall by the
Larry Rosenstock, CEO and founder of HTH, and Rob Riordan, the legendary
Emperor of rigour. The hall was already a mass of parents, families and
business leaders from local toy factories. This was quite a daunting audience.
My eyes settled instantly on a student who appeared to have no toy on display
in front of them. Approaching her, she smiled, and I asked “Where is your
toy?”. She smiled again and said “I did not get it finished in time”. At this
exact moment David Price, our party leader and very astute educator,
interrupted and asked “Where is your work?”, “Again she smiled and began to
explain again “I did not get finished in time, but I will get it ready for the
first graders on Monday”. Just as I was about to ask what had happened, Martin
Said, a true gent and master classroom craftsman, interrupted asking "Sorry, where is your work... This is a rather
extreme form of student accountability. As extreme as this sounds, with three
unknown adults, who are hugely interested in education, that have travelled
thousands of miles to be there are grilling you on where your school work is.
The surprising thing for me was how
well she coped with this. She smiled, listened
to our questions, communicated clearly, honestly responded to our
queries. Infact, she excelled in this situation. Her work was actually
finished, but she had run out of time putting a high-quality finish onto it,
and was not prepared to put inferior work on show. Yet, she had a large ring binder
file, overflowing with her learning, which she gleefully shared and explained.
It was very clear that she had learned lots of physics, lots of technology and
was getting to grips with how to be a very successful learner. The exhibition
served as very productive reflection for this student.
Now, I know that at first glance
this looks almost superficial with students standing next to their work in a
kind of glorified show and tell. I know it also sounds risky, with parents and
visitors coming in to view the quality of student work, ergo your work.
Furthermore, I know this sounds a complete pain in the backside scheduling
student work, writing letters and organising an event in an already bounteous
workload. I know these things, yet I wholeheartedly recommend that you do this.
If I can’t convince you then please speak to your Art department at school, who
have always done this, and ask what effects it has on the students. It does
indeed require a curriculum set up to do this to this scale, but even small extent
it can raise the stakes for students on quality and importance of their work
matters. A simple mechanism is to may be sit at parents evening looking at
student work rather than just some numbers on a piece of paper.
These schools clearly and obviously
value both academic and character building success, and provide the operational
conditions that allow student to thrive here. Berger challenges us to imagine a
school culture that for students to fit in they must do well academically and
be kind. What would you have to do in your school and classroom to start to
work to this end? To normalise academic success as “what we do around here”
requires more than one teacher efforts being supported fellow teachers, sharing
and using consistent language of practice and shared values are essential. We
intuitively understand this, as part of what we rely on to work as teachers.
Our challenge is to provide classrooms that students get to see this too.
On a visit to two expeditionary
Learning schools I was struck by the consistency of language used by the
teachers. Nearly every classroom exchange (and hallway for that matter)
involved the language of choice that lead in making their own decisions. The
notion that self-direction is powerful in these communities, although it should be noted that students may
not naturally provide such a supportive environment. Communities need building,
and one such story comes from Kathy Greeleys’ wonderful book “Why fly that
way?”[5]
The transformation of a disparate and fractious groups of students into a
cohesive and supportive community is far from a straight story, beset with
setbacks and slow progress. Greeley’s persistence and belief in keeping
classroom culture at the heart of her endeavours and planning eventually works
for these students. At times, she took the brave decision to shelve the
curriculum until the issues in the class had at least been challenged. This
will certainly ring true to a lot of teachers where either the students’
behaviour, attitudes and relationships must be addressed before they are able
to productively engage with the curriculum. It reminds me that sometimes
culture must trump content.
At the heart of Greely’s approach
was the belief that rituals and routines can be used to value the qualities of
the community they were striving to be. Her students were provided many
opportunities to talk and share thought and feelings, as she sought agreement
on the student culture, in circle time. Circle time- the act of sitting
students in circles in order to talk may seem a little childish or even
hippy-ish, but they do allow sharing without authority, hierarchy and the
sharing of ownership, and in doing so help build relationships.
Berger, Greely, Expeditionary learning
and High Tech high encapsulate much of what was defined as the conditions for
“Powerful learning “ [6]
The components as:
- . What
they learn is personally meaningful.
- What they
learn is challenging and they accept the challenge.
- /What
they learn is appropriate for their developmental level.
- They can
learn in their own way, have choices, and feel in control.
- They use
what they already know as they construct new knowledge.
- They have
opportunities for social interaction.
- They get
helpful feedback.
- They
acquire and use strategies.
- They
experience a positive emotional climate.
- The
environment supports the intended learning.
Uncommon schools
“Teaching is the best and most important work in our society” Doug
Lemov 390
The first thing that strikes you
about Uncommon schools is just how teacher centric their approach appears. They
take this approach as a group of pragmatic idealists that didn’t chase
educational equity in the abstract but pursue it relentlessly as instructional
problem solvers in learning communities. It is based on a belief that students
rely on teachers to create such environments. They started by looking closely,
analytically even at what the most successful teachers did, the ones whose
students were “joyfully engaged academically, working collaboratively as a
team, and generating jaw dropping results”. In his book, Teach like a champion 390
Lemov identifies that teachers are not often serious about learning from
teachers that are like this.
This approach is remarkably similar
to the Effective Teacher behaviour research of Reynolds and Mujis [7]
we saw in chapter 7, in which we summarised effective teacher as:
Effective teachers are confident in
their ability, and highly committed to the success of all students. Their
interactions are consistently fair and respectful, inducing a sense of trust in
their classroom. They have the ability to think analytically and conceptually
allowing them to be flexible in their approaches. They act proactively and are
constantly seeking out information to make good decisions. They set high
standards, modelling them and hold others accountable. They have an
overwhelming passion for learning and what education can do. They work in
teams, understand the motivations of others and seek to influence them in
positive ways. They communicate clearly and are inclusive. They employ a
variety of teaching methodology that engage and stimulate thinking. They take
an active interest in their own pedagogical content knowledge and use this
knowledge to teach as well as they can. They create classroom communities that
provide an ordered and civilised climate where students feel safe and suitably
challenged. They teach and they learn and seek to model the behaviours that
exemplify these noble pursuits.
The teachers the Uncommon Schools
studied excelled at the parts of a teachers job we often take for granted, or
consider to mundane: How we patrol our classrooms; How we ensure that all
students are engaged; How we target questions; How we frame situations in a
positive light; How we use time well; and how we strategically move students on
.
Uncommon schools take pride in “well delivered lessons [with] a heart of love,
and [the] celebration of teachers for their impact on students life
trajectories.” It sees itself as an organisation that is about great teaching
and teachers most of all.
Their approach is based upon “sure
fire routines, and a joyful culture that builds a productive platform for
learning”. It is more than just really good classroom management with a
critical focus upon a “culture of error” where it is safe for students to show
their mistakes. A culture that resonates loudly with the themes of this book:
students’ prior knowledge, their misconceptions and how we can use feedback
well.
Teachers are portrayed as artisans,
who use simple tools to craft learning and students. The tools may be simple,
but things of beauty can be created . It is the focus on getting what may be
considered the small things right, and much more. In perfecting the use of
simple tools, we get to reflect upon the art of teaching too. Lemovs’ book,
forms the basis of teaching toolkit for teaching well and ensuring all students
achieve. Lemov insists on naming techniques so that a common language can exist
to allow teachers to “analyse and discuss” the classroom, and perhaps more
importantly be ready to “adapt and adjust” the techniques so their style,
context and students are catered for as well as possible.
The problems of teaching are
endemic, and therefore “entirely predictable” according to Lemov. You may have seen
this approach alreadyon this blog, with PEEL’s “teacher concerns”.
Similarly the Uncommon Schools approach seeks to align common problems with
“specific, concrete and actionable techniques” . It is the skill of the teacher
to select the right tool, for the right job at the right time.
The Uncommon Schools is neatly
encapsulated in what seems to be a benign teacher action whilst issuing
resources., in this case a worksheet. The teacher has the student practice
handing sheets around the classroom so that it takes around 10 seconds to
complete, rather than the usual 80
seconds, thereby saving a significant amount of time each lesson, each day and
each academic year This allows the students to concentrate more on what
matters: the cognitive work, and many of
their routine and rituals are used to build “strong learning habits” and increase student autonomy so that the proportion of cognitive work
increases. This may not sound that important to leafy suburban schools, but the
structured approach and the accountability and autonomy the routines imparts
have been seen as instrumental in tackling the achievement gap between the rich
and the poor. The ethos of Uncommon schools is to focus “primarily on serving
students of the greatest need”. These may well be the students who do not have
the consistent and structured home lives that lead to good self-regulation and
learning habits, so the orderly approach provides their experience of how this
can help a person become successful.
Interestingly, the idea of culture
in Uncommon Schools is linked inextricably to behaviour, once more reminding us
that behaviour management is not enough, as Lemov rightly points out “order is
necessary but not sufficient for learning, and culture is more than just
eliminating disruption”. Lemov goes on to define what culture means in this context
identifying five principles, that when “well balanced” can provide for a
“strong” learning culture.
The following table will hopefully illustrate the hierachy within these principlesand gives prompt s for teacher thinking and planning steps.
Principle
|
Definition
|
Implications for the teacher.
|
Planning questions
|
Discipline
|
Knowing the right way to do
something.
|
Students must be shown/ taught
how the teacher wants each task done.
|
When and where do the students
get to practice these routines/ techniques?
How do you know when this routine
has become a habit?
|
Management
|
Process of reinforcing behaviours
|
Relationship building is an
essential part of this.
Rewards and sanction become less
effective over time.
|
How do you construct
relationships that are ”non-transactional” i.e. contain no rewards or
punishments.
How do I link good learning
behaviours and academic success?
|
Control
|
Capacity to cause someone to do
what you ask
|
The power a teacher has to assert
control over a class the more freedom can be given.
Students are more likely to be
controlled by someone they trust.
Being specific with language-e.g. instead of
saying “calm down” rephrase to say
“please return to your seat and
start your work”
|
How can you phrase your requests
so that they are more likely agreed to?
How do you build trust with
students/
|
Influence
|
Next step beyond control. Helping
a student to internalise the thing you suggest
|
Aim of using influence is to get
students to believe in long term success by wanting to behave positively.
Often a failure to exert
influence is what stops students from believing in classroom cultures
designed for their benefit
|
How do you move students from
behave to believe?
How can you building in greater
autonomy so that the students have greater ownership of the responsibility
for learning?
|
Engagement
|
Engaging students in “important,
interesting and challenging work”
|
How do we get students to do more
of the cognitive work?
|
How do we transport students to
“real scenarios?”
How do get students to have a
vested interest?
|
So, what can we learn about
classroom culture from these institutions?
Most importantly, culture does not
lie in the differences between these approaches, but rather in their
commonalties. Just as we need to be able to explain the concepts of our
subjects in multiple ways, we also need a variety of approaches to start, develop
and maintain a productive classroom community. Kathy Greeley’s book- Why fly
that way? – highlights that the answer will be different for different students
in different contexts, there is no one right answer. But it is in the blend of
elements that we can begin to understand.
Both emphasise high academic expectation as a central tenet to their approach,
communicating that all students are
capable of achieving highly. Students success is clearly correlated to
teacher expectations. [8]
However, this is easier said than done. Poor differentiation, along with
teachers de-selecting concepts which they believe students cannot comprehend,
even before the students have attempted them, ultimately cause our students to
experience low expectations All too often we just hidebehind the claim that we
have high expectations of their “behaviour”. Yet the mathematics here is
simple:
Low Academic expectations + High
Behaviour expectation= Low expectations
Our craft and skill here, is how we
sculpt a culture that encourages student to be willing to tackle all that you
throw at them academically speaking, and how we grant access to all of the
content to students who are “less able” or in reality students who have
impoverished prior knowledge. Lest we forget all students have the same
capacity to learn, it is just the so called “more able” have a higher starting
point when it comes to the attainment tests, that inform our opinions of
ability. Our ability to express high expectations
begins with how well we can cater to their needs.
Perhaps the most surprising aspect
that both approaches share is the prominence
of the teacher. Without highly motivated and supremely motivating great
teachers neither system would work. Do not be misled by the apparent student
centric view of Expeditionary Learnings approach. There is a great deal of
design, organisation relationship building along with brilliance in their
teaching behind this successful school culture. Likewise, it would be folly to
think that the teacher centric aspects of Uncommon Schools are the be all in
and end all of their success. Their culture works because the teacher creates
the environments in which students take increased
levels of autonomy and responsibility in their learning.
Both organisations believe that the act of learning can be
learned, so that students can increase their capacity to do more of the cognitive work of learning,
which ultimately, they develop deeper academic understanding. Routines and rituals are ubiquitous in
both approaches in order to provide smooth running classrooms and facilitate
student work. It is the habit-forming nature of these ways of working that
forms the basis of the students learning skill set and attitudes.
Routines and rituals require a common language and understanding.
Sharing language with fellow teachers and with students allows the conversation
of the classroom to be about learning, and how to do it. Learning becomes the
culture, and how we use routines and procedures and their associated pedagogical purpose are what changes
it.
Finally, both approaches understand
that it takes time to build a truly aspirational and supportive culture, and
that the rules and routines are just the start points, and that we must
proactively develop our classroom cultures.
Some suggested Reading and References
[1] An ethic of excellence _ Ron Berger.
[2] Graham Nuthall The Hidden Lives of Learners NZCER
[3] Now this section of the book is going to make me sound like some
right jet setting Charlie, and for that I apologise. Although the sweet Maine
lobster in Portland, and the view from the Pacific Beach Alehouse in San Diego
make it ever so hard to be sincere with this apology.
[4] Expeditionary Learning Core Practices.
[5] Kathy Greeley Why fly that way?
[6] Ron Brandt http://www.ascd.org/publications/books/198179/chapters/Conditions-for-Powerful-Learning.aspx Accessed 27/07/17
[7] Reynolds and Mujis 1999 The Effective Teaching of Mathematics: A
review of research
[8] Speybroek et al: The Role of Teachers' Expectations in the
Association between Children's SES and Performance in Kindergarten: A Moderated
Mediation Analysis
Monday 23 March 2020
Podcasts for A level biologists
On Friday I discussed the plans for my Year 12 Biologists, and said I would send them a list of good Biology reads. One students pipes up that he would prefer podcasts, and several others seemed excited at the prospect. So, I have listened to most the BBC Sounds App, ( The BBC is glorious, but needs to ditch the "Sounds APP" because I just don't get it. ) and come up with some radio shows that will help set the Biology in context, demonstrate the application of the Biology, and hopefully inspire some University choices.
I have purposefully not selected the large Coronavirus programming, except for the excellent show Inside Science, which is excellent and is also varied. I am not trying to cover the curriculum but providing them a chance to relax, practice listening and enjoy their own Biological knowledge. So here are my starters for 10...
BBC Inside Science https://www.bbc.co.uk/programmes/b036f7w2
Anatomy and physiology
Systems and organs are well broken down in this series https://aca.st/
Memory and Alzeihmers https://www.bbc.co.uk/sounds/play/p0359kvy
Genetics
Naming genes https://www.bbc.co.uk/
The age of the Genome https://www.bbc.co.uk/
Ecology and Evolution
A brief Natural History https://www.bbc.co.uk/sounds/play/b01pw1nr
The Cuckoo https://www.bbc.co.uk/sounds/
Aping evolution https://www.bbc.co.uk/
A guide to Farmland birds (others are available) https://www.bbc.co.uk/
Sunday 15 March 2020
Literacy, Assessment and Memory bundles. LAMB's
Way back in June 2018 our Science department attempted to set out what we wanted our
curriculum to be like, after our initial interleaving of the concepts. Since
then we have been working towards this through our Wednesday CPD time,
curriculum development tasks and through the idea of the weeks. Each part of
our wish list depends upon the design of the curriculum, our choice of pedagogy
and our skill as teachers to deliver it.
Reading this list again the prominence of Literacy,
Assessment and Memory in what we value is
very clear.
To ensure
constructive alignment every SOW has
●
Learning Intention sheet for student books
●
Key ideas/ Misconceptions clearly identified for
teachers
●
Pre- quizzes aligned to learning intentions
●
Been double checked against the syllabus
To ensure quality two way
feedback every SOW has
●
A prequiz using an assessment grid
●
Marking tokens for each key ideas.
● Tasks that have inbuilt self
reflection and assessments
● Useful demonstrate tasks for
quick teacher feedback. (eg Hinge questions)
●
End of topic tests and/or is part of a summative test
●
Tasks to develop exam technique
To ensure
development of student skills and knowledge (including literacy)
●
Regular opportunities to write in an extended way-with
feedback
●
Read complex academic texts to develop student scientific
vocabulary.
●
Tasks that develop vocabulary.
●
Tasks to practice scientific skills- with feedback
●
Tasks and marking tokens that focus on Required
Practicals and associated language and skills.
●
Strategic homework
To ensure long term retention
●
Multiple exposure planned and made clear to teachers
●
SOWS are
interleaved and spaced - 5 years.✓
● Tasks to activate prior knowledge
● Use of low stakes testing eg last
year, last topic, last week,last lesson
●
Planned spaces between teaching and marking tokens.
●
Knowledge organiser for each topic
●
Strategic homework
To ensure clarity of
teaching
●
Slides that structure and augment explanations- not
necessarily to scaffold a lesson.
●
Clear useful diagrams, analogies, images
To ensure engagement
●
Task that set context and provide interesting hooks
●
Tasks develop student agency
Literacy
“Reading, writing, speaking and
listening, are at the heart of every subject in secondary school. Focusing time
and resources on improving reading and writing skills will have positive
knock-on effects elsewhere, whether that’s being able to break down scientific
vocabulary or structure a history essay.”
It
recommends the
● Prioritising
of subject-specific literacy skills across the curriculum.
●
Teaching
vocabulary to support pupils’ development of academic language.
●
Developing
students’ ability to read and access sophisticated texts
So, it is with this in mind that we have developed our
Literacy strand to our new Literacy, Assessment and Memory bundles (LAMB’s).
This has been a major focus for the idea of the week since it began, and so we
have many simple and effective strategies to hand. Many are summarised here: A summary of Literacy strategies
Assessment.
Macfarlane Dick and Nichol recommend that good feedback practice:
1. helps clarify what good performance is (goals, criteria,
expected standards);
2. facilitates the development of self-assessment
(reflection) in learning;
3. delivers high quality information to students about their
learning;
4. encourages teacher and peer dialogue around learning;
5. encourages positive motivational beliefs and self-esteem;
6. provides opportunities to close the gap between current
and desired performance
Providing effective feedback is a complex business, but two
general principles seem to apply fairly consistently.
- As students approach
mastery a delay in feedback can be beneficial, for example after an exam
or marking token .
- Immediate feedback is beneficial
when students are in the early stages of developing their understanding.
○
Task level feedback is only useful here
○
We must balance giving feedback and teaching new ideas
as dealing with feedback uses a lot of working memory.
So, we must provide focussed opportunities to check student
understanding that are quick and to the point but still aiming to meet all the
criteria set out by Macfarlane- Dick and Nichol. It is especially important
that the dialogue between teacher and student dialogue, as in the two way
feedback on our wishlist. Ultimately,this will increase the amount of quality
teacher feedback in books but reduce the burden of marking. This again has been
a recurring theme in the ideas of the week. At the heart of these strategies is
the idea of a hinge activity to reveal the student
current understanding quickly and accurately.
Memory.
Memory.
The Memory strand, as the others has been a major theme for
idea of the week. A summary of the strategies can be read here The strategies include those that
support the limitations of working memory and strategies that seek to encourage
long term retention of knowledge.
Our pre-quizzes work on the The Pretesting Effect which paints a somewhat counterintuitive view
of learning and testing
“In terms of long-term
learning, however, unsuccessful tests fall into the same category as a number
of other effective learning phenomena - providing challenges for learners leads
to low initial test performance, thereby alienating learners and educators,
while simultaneously enhancing long-term learning.”
To supplement this retrieval practice is a way of supporting
the retrieval strength of learned concepts. The students in essence practice
how to remember. We have been long time fans of the expanding retrieval schedule and many of us have
selected to measure its impact for the Great Teaching Groups. As Lee Croucher
astutely pointed out this week, the design of these is somewhat responsive to
how well students have performed in previous lessons, and this makes it more
difficult to pre plan this kind of task. What we can prepare are question banks
that will provide regular practice with the big, frequent and important ideas
within them.
Conclusion.
A key strategy in learning is the
idea of multiple exposures to the idea being learned Nuthall
said
” Provided a student is able to piece together, in working memory, the equivalent of three complete definitions or descriptions of a concept, that new concept will be constructed as part of the students long term memory”
His
research primarily suggests some useful planning suggestions. So that for
learning to take place, students must:
interact with a full explanation of concept at least once.
interact with the information on at least four separate occasions
This makes the tasks in the LAMB’s so very
useful, providing the opportunities to revisit the concepts over and over again
in differing ways so that learning has the best chance to happen. Teaching followed by a literacy strategy, followed by a memory task followed by a focused assessment makes this a realistic aim.
Strategy is one thing and so it supporting teachers to feel equipped to use new them So the ideas included in LAMB’s have been (and will be) supported by the idea of the weeks to help us deliver the great curriculum our students deserve. Each
task, in essence, is quite small, and will not take long to plan. So relatively quickly it should be easy to build up a library of useful tasks- focused on key ideas and misconceptions. Imagine a department of 10 (pretty easy for a Science, Maths or English department) contributed one task per week over the course of a year
we could have around 380 tasks to support the development of our students'
scientific literacy and supporting their
learning through quick and effective assessment and opportunity to transfer
knowledge to their long term memory. It certainly is a worthy aim.
The first two LAMB's are available here.
The first two LAMB's are available here.
Subscribe to:
Posts (Atom)